
When you capture frames of animation in eXposer, they are written directly onto your hard disk. These frames can be of any quality and resolution, they are independent from the animation preview. The fact that eXposer writes the captured images onto disk makes it very resistent to any system failure. You have to provide a folder and a filename to specify where to save the frames.
We recommend a decent folder setup for your project before you start capturing any frames. For example, create a main folder for your project, inside that one, create folders for every scene, and inside each of those, create a folder for the captured frames. Since eXposer will refer to the files it loads with their full path, you will run into problems when you move stuff later on. (If you run into this problem, there is a solution in the FAQ section of this documentation.)
By the way, to see how you set the resolution for the captured frames, go to the description of eXposers settings window.
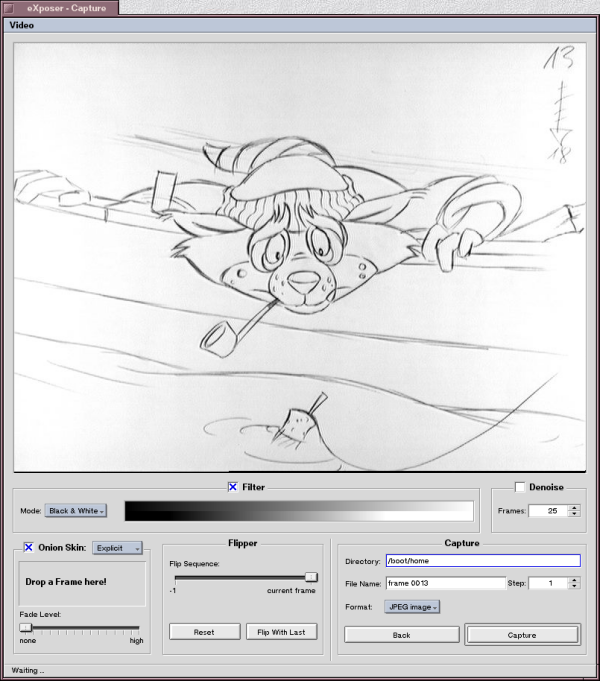
This is the capture window of eXposer (drawing by Jim Albrandt). Besides the main area where the video signal is displayed, it is made up of five parts:
Filter
This control gives you a way of enhancing the contrast, if adjusting the settings of your video hardware in Video->Preferences isn't enough. There are three filter modes available: Black & White, Component Color and Uni Color. The first converts the video to shades of grey only - additionally to letting you define the contrast of your image. The other two leave the picture colored, whereas the Component mode let's you control each color component individually.
In all modes, the sliders have an upper and a lower part. The upper represents the colors in your source video. The lower represents a range of colors that the source signal is mapped onto. The sliders let you control two values:

One is where black ends, the other is where white starts. Colors below black will become black and colors above white will become white in the resulting image. Colors that map to the range inbetween black and white will make up the resulting colors in the final image. Just drag arround to see how it works. If you click closer to the white "hotspot", then that's what you're dragging. Otherwise you're dragging black. This gives you a very powerful way of putting all the contrast of the filtered image within a certain range of colors of the original image.
Denoise
This is another way of improving the quality of the captured frames. It is based on a trick: Since your camera will most likely display a still frame, the only changing aspect of your video is noise. By capturing a sequence of multiple video frames of the same image and taking the average of each pixel, you remove video noise quite effectively. Thus the Frames value will let you specify how many frames you want to capture that will then be averaged.
Onion Skin
This is a tool for controlling your animation. It offers two modes of operation: Trail and Explicit. The trail mode represents a kind of buffer, where your recently recorded pictures are stored. If you turn Onion Skin on, they will be mixed with the current frame of your camera. The Depth slider controls, how many frames back you can store at a time. The Fade Level lets you adjust, how strong the frames are faded away in the resulting mix. "None" means that pictures are equally visible, whereas high means, that the camera frame is very well visible whereas the older a picture is, the less visible it gets.
Onion Skins second mode, Explicit, is meant for adjusting the position of a new frame to an already recorded one. You can drag'n'drop any frame from either the Tracker or the list of Source Images.
Flipper
gives you access to the earlier mentioned buffer of the onion skin feature - but in a different way: You can flip through your frames. Flip Last is just for convenience. It flips the most recently recorded frame with the current frame in the camera. Reset will empty the buffer, which will also effect the onion skin feature.
Capture Controls
This is where you actually capture frames to disk. So you need to specify a location - a directory on your harddisk (You can also drag'n'drop a folder from the Tracker). And you need to specify a name. Last but not least, you can specify an image format that will be used for storing the frames. Use JPEG, if you're uncertain. Of course, if you don't put a number into the filename, eXposer will overwrite the same file everytime you capture a frame. The number you put rightmost into the filename will be counted up by how much you've specified in Steps. So scene01-frame0001.jpg will become scene01-frame0002.jpg. You don't need to give the filename an extension (".jpg"). BeOS is smart enough not to need it. However, Windows is not, so if you know you will need those frames in Windows, too - use an extension, but don't use ".jpg" if you're capturing in TGA format!!! This will drive you mad when working in Windows! Really.
You want to hear a sound when you captured a frame? Go to BeOS->Preferences->Sound. You'll find an event called Capture there, which eXposer registered for you. Just tell it what sound file to play and from there on, you'll here the sound when you hit Capture.
A couple of things about image formats: It is important to know, that when you pick a format from the pop-up, you make a decision about quality versus disk space. Some formats reduce quality, like JPEG, some are very good at black and white. JPEG is always good, since it gives you a very (!) good quality/disk-space ratio and you can open them on all computer systems known to mankind. (Well except for maybe in some really weird places...) Anyways, you can save PAL-sized frames into 30 to 40 Kbyte files, without noticing any quality loss. However, JPEG takes longer to load (when you open that x-sheet later on). So maybe you like to pick a format which loads faster, but consider that if it needs more diskspace, the speed of your harddisk might be the new speed factor.
By the way, there is a preference panel BeOS->Preferences->DataTranslations, where you can control the settings of every installed image translator.